How can we help you?
Link Shopify to HaydiGO

This is a guide to creating a link between Shopify and HaydiGO.
We are working on an upcoming release where our customers will be able to add marketplace integrations to their product list and stores themselves, such as shopify, lightspeed, woocommerce or other marketplace integrations that HaydiGO currently offers.
HaydiGO doesn’t have a public APP in the Shopify Shop yet, so until we have a public app in the app store, the only way to integrate your store with HaydiGO is to use API keys with Shopify’s Private App functionality.
– Shopify orders and products are automatically imported into HaydiGO every 10 minutes, instantly updating inventory and creating a pick list in the GODesk.
– All products with SKU and EAN codes are imported into HaydiGO or matched with existing products in a chosen product list. Every 10 minutes, new products created in Shopify are also added in HaydiGO. We immediately include all standard Shopify fields.
– Update and sync inventory: Is the product sold through other channels? Then it will also be updated directly in Shopify.
– Order status: Orders processed in GOdesk are automatically set to processed in Shopify. The system directly links your shipment to the products in WooCommerce and thus completes the orders.
pay attention!
Before going live, check that all products have a unique SKU and EAN field content. HaydiGO requires that all products have a unique SKU value and EAN value (for scanning and processing your products in the Warehouse). If you have not yet specified EAN values, HaydiGO will also place the product’s SKU value in the EAN value field in HaydiGO, so that the requirements in HaydiGO product information are automatically met. Of course, choosing these products without a valid barcode value will eventually become a problem if you use the HaydiGO scanning solution.
Failure to meet mandatory field requirements/unique SKU field requirements will result in HaydiGO not harvesting your products and orders correctly. Products are not created in HaydiGO and orders are not added to HaydiGO for further processing.
Roadmap
Step 1
Log in to your Shopify environment and click Apps in the menu on the left .
Step 2
Click on “ Develop apps ” in the top right corner
Step 3
If you disabled private apps; you will get a message to enable it. Do this so that a private app can be created.
Press the “Create an app” button to create a new app.
Step 4
Fill in the requested information:
- Private app name: HaydiGO
- App Developer: Support@haydigo.com (if you have given us access or your own admin account).
Now we create the app and need to configure Admin API scopes.

Step 5
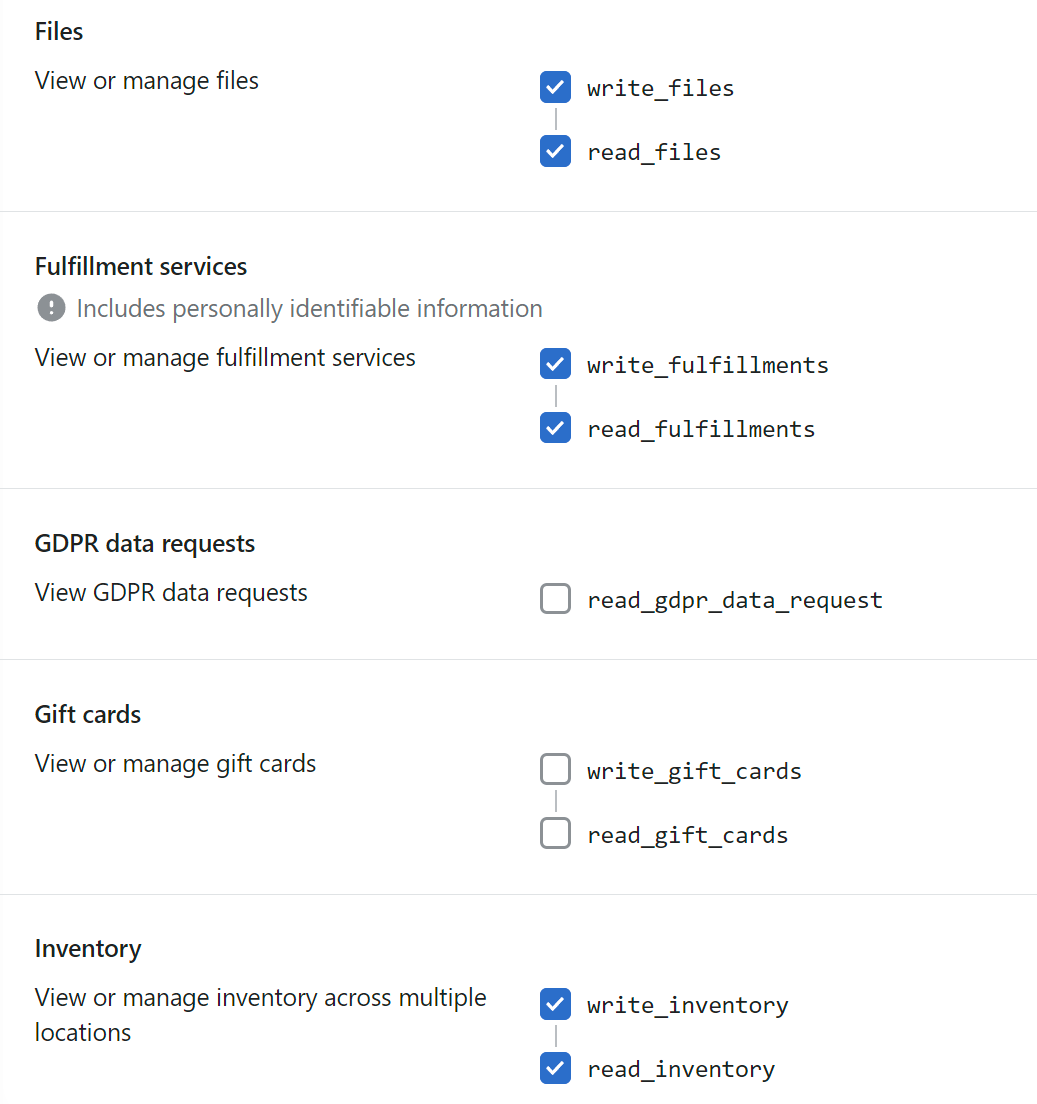
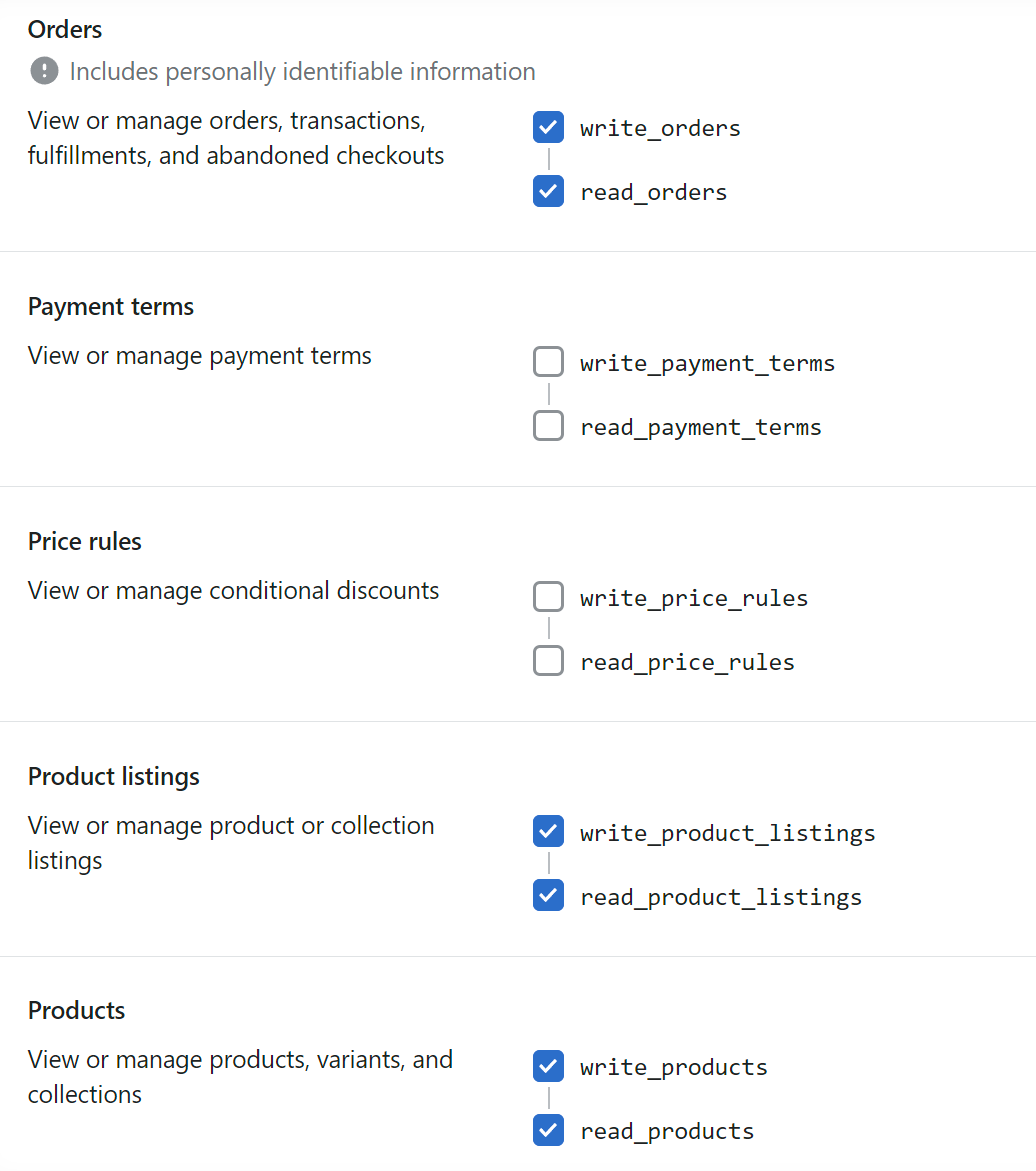
Now grant the HaydiGO application the following permissions:


Step 6
You now need to generate the ADMIN access token. Note that this is only visible once, so copy and paste it into notepad for example, because HaydiGO support needs this Admin key to integrate with HaydiGO.

Step 7
The next step to complete the integration is to share the HaydiGO warehouse location ID to update the inventory. Otherwise, inventory updates will not work without this location ID. You can create a new location for your fulfillment company or share an existing location ID set by the inventory updates.
Follow these steps to share your location ID:
– go to Shopify Settings> Locations and add or select a location.
– Now click on this location to see the details of this location.
– The Location ID Number can be found in the URL of your browser. Write the number in plain text.
Step 8
Create a product list and a webshop. You can read how to do that in the articles below.
Step 9
The last step now is to share these private app access keys with the HaydiGO team so that we can set up the integration with Shopify.
Create a new email and send it to the HaydiGO support email address (support@haydigo.com)
To link a webshop to a marketplace, we really recommend the following steps, so that everything goes very quickly and smoothly and you can go online/live as soon as possible.
Your topic structure should be as follows:
Assign New Marketplace to ‘Haydigo Store Name’ / ‘HaydiGO Product Store Name’ | ‘Marketplace name’ .
Example topic: Assign new marketplace to MyWebshop / MyShopProductList | Shopify
The content of your email should contain the following information:
– Marketplace Name (Shopify)
– Store name
— Product store name / list
– Shop API Url (example http://xxxx..myshopify.com)
– ADMIN KEY
– API KEY
– API SECRET KEY
– Location ID Number
– If there should be a country filter for receiving orders (specify countries which orders should not be added to HaydiGO).
– Login details to webshop, so that we can check/verify that the integration works (if shop owner allows this)
– When do you want to go live with this marketplace?
We always harvest produce first so you can assign locations and inventory to products. After this, you can usually ask us to enable order harvesting from Marketplace so that orders are added to HaydiGO and you can fulfill those orders.